Lungeing a horse is a long-established means of providing training and exercise, proving useful when time and space are limited or if a horse needs work without a rider on. But do you know how to lunge a horse correctly and effectively? If you’re unsure, then read on to learn more about this useful skill.
So, what is lungeing?
Lungeing is a training method that involves the horse moving in a large circle around the handler. The handler is attached to the horse via long lead rein — known as a lunge line — and the horse moves around the handler in a circle. The distance between the horse and the handler dictates the size of the circle. A horse can be lunged in all gaits and both directions (clockwise and anti-clockwise).
Basic lungeing is fairly straightforward for both the horse and handler to learn, but being able to identify if the horse is working optimally and in such a way to improve their balance and movement is a skill that takes time to develop.
What are the benefits of lungeing a horse?

The handler is attached to the horse via a long lead rein — known as a lunge line — and the horse moves around the handler in a large circle
There are a number of reasons why lungeing is beneficial to a horse, including:
- Improving or maintaining cardiovascular fitness
- Developing strength and topline muscle
- A beneficial form of exercise when time is limited
- Useful for helping to settle an overly energetic or fresh horse before a rider mounts
- An early training exercise for young horses where they learn the basic voice commands, to more forwards independently, and to become familiar with wearing tack
- Adding variation to an exercise programme
- Can help a horse become more supple, engaged and obedient
- Helps a horse become more balanced without the weight of a rider
- Aids the bond between a horse and handler as voice commands are used to move the horse between paces
- The rider is able to see how the horse is moving and working from the ground
When used under veterinary direction, lungeing can play an important role in the rehabilitation of certain physiological issues, such as impinging dorsal spinous processes (kissing spine) or pain in the sacroiliac or caudal articular facet (joint surface) regions. Always consult your vet before lungeing a horse after any type of injury.
The potential dangers of lungeing
Lungeing can be hard work for the horse and it doesn’t come without risks, especially if your horse has a tendency to play around or you aren’t skilled in how to lunge a horse correctly. The potential dangers include:
- Working on a constant circle places excessive strain upon the distal limb structures
- Torque and twist — when a horse is working on a circular path, his body is subjected to a “centripetal force”, which is directed towards the centre of the circle and causes him to lean inwards. He lean in towards the centre of the circle to reduce the force on his limb joints, created as each hoof makes contact with the ground. If he didn’t — and maintained the same posture as if he were travelling in a straight line — this would further increase the force on his joints. The centripetal force, and therefore the amount of lean, will be greater as circle becomes smaller and the speed increases. Put simply, the faster the horse goes and the smaller the lungeing circle, the greater the strain.
- If the horse gets tired, they may stumble or take a “bad step” that can result in a musculoskeletal injury
- Risk of slipping if the surface isn’t suitable; you should aim to lunge your horse on a non-slip surface that is as flat as possible
- Risk of losing control of the horse; unless your horse is an experienced and well-behaved lunger, opt for a smaller area to lunge in rather than an open field
Lungeing, or any exercise which involves small circles, should not be used for rehabilitation purposes of certain injuries, such as collateral ligament injuries of any joint, typically the coffin joint, the tarsocrural joint in the hock and the fetlock, and suspensory ligament branch injuries. Always consult your vet before lungeing a horse after he has sustained any type of injury.
What kit do I need to lunge a horse?
As well as a lunge line and a lunge whip, your horse will need either a bridle or lungeing cavesson. The handler should always wear a riding hat, gloves and suitable footwear for safety.
A lungeing cavesson is recommended as it removes the sideways pressure of the lunge line from the horse’s mouth, which can encourage the horse to tilt its head or snatch away from the rein. By attaching the lunge line to the central ring on the cavesson noseband, the horse is encouraged to flex slightly to the inside without tilting the head. It also makes it easier to swap from side to side when changing direction. Some cavessons have attachments to allow the bit to be added. Otherwise, a skeleton bridle with the noseband removed can be worn with the cavesson if a bit is required.
It is sensible for the horse to wear overreach boots on their front legs and brushing boots all-round to protect against accidental knocks.
The horse can also wear either a correctly fitted roller, or their normal saddle with either the stirrups removed or secured in such a way to prevent them banging around.
Here is a selection of useful lungeing equipment if you’re incorporating this form of exercise into your horse’s training programme.
Lungeing aids

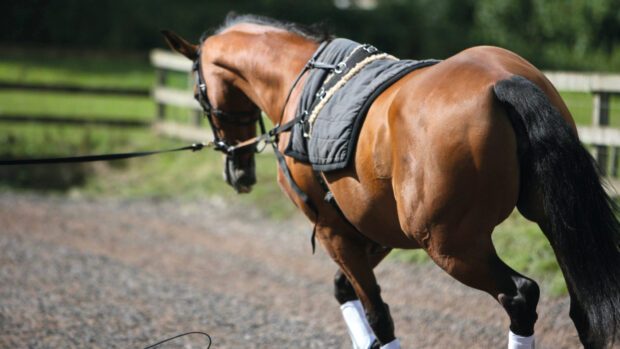
Lungeing training aids, such as a Pessoa, can be beneficial if fitted and used correctly
There are several lungeing aids that are designed to be used to help improve the horse’s way of going, including:
- Pessoa — uses ropes and pulleys to encourage the horse to stretch over his back and work into an outline.
- Chambon — a strap which runs from the girth to either side of the bridle or bit to encourage the horse to lower his head by applying poll pressure when he puts his head in the air. The pressure is released when he lowers his head.
- De Gogue — similar to a Chambon, but the De Gogue passes through the bit rings. Used to help build muscles and promote a round outline.
- EquiAmi Lunge Aid — the chest attachment is placed on the girth or belly of the roller. The aid goes right around the back of the horse, looping through the bit and back to the roller. It places the horse in a self-centering loop. It helps the horse to step under from behind, using his back and lifting his shoulders, working into a soft, equal contact.
- Bungee reins — elastic reins which pass through the bit and clip to either the roller, or the D-rings or girth of a saddle. They encourage the horse to lower the head and neck while inhibiting forward movement of head.
- Side reins — two separate elasticated reins that clip from the roller or saddle and run to the bit. They keep the horse’s body fairly straight and prevent the horse from bending excessively in either direction.
- Harbridge — attaches to the girth or roller between the horse’s legs and the two separate elasticated lines run up to the horse’s bit, attaching on each side. They aim to lower the horse’s head carriage.
All training aids must be used with care and as a temporary aid to help teach the horse a better way of going. They must be fitted correctly to have the desired effect. If you’re unsure on how to fit or use a training aid, ask a trainer to help you.
How long should I lunge my horse for?
Lungeing is hard work for a horse so it’s essential that the lungeing session is suitable for his level of fitness.
Lungeing sessions can vary in length, but single bouts of activity should not exceed around 20 minutes as working on a continuous circle can put strain on the horse’s joints and limbs. Consequently, short periods of lungeing are preferable and you should keep a constant eye out for signs that your horse is tiring.
You can build your horse’s fitness up over time, starting with shorter sessions. When he gets fitter you can slowly increase the length of the lungeing sessions.
How to lunge a horse correctly: the process

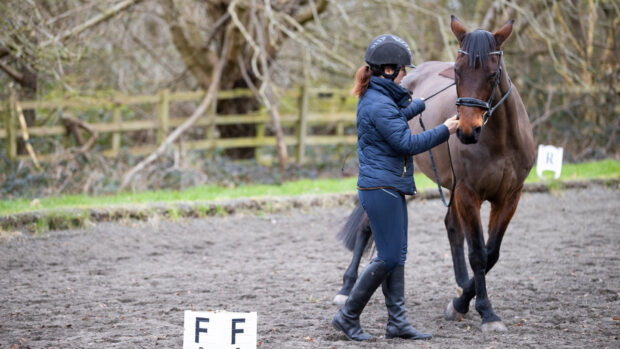
This horse is ready for lungeing in a bridle with boots on all four legs.
- When training a horse to lunge, it is best to begin without any training aids until he learns how to move around the handler
- Enter the lungeing space by leading the horse. The handler should stand in the centre of the circle
- Direct the horse out onto the rein you wish to begin. If you are beginning on the right rein, hold the line in your right hand and the whip in your left. Mirror this when you change direction
- A session on the lunge should be similar to a riding session. Start by allowing the horse to naturally stretch down in walk, then trot so they can gradually warm-up their muscles, before asking them to work in a more uphill frame, doing upward and downward transitions
- Once the horse is warmed up, then you can attach the lungeing aids if you are using them. Do not begin a session with the aids in place as the horse is more likely to pull a muscle or get injured as he has not had time to loosen up
- Canter is a challenging pace for a horse on the lunge and should only be introduced when the horse is able to easily maintain their balance in trot and through transitions
- At the end of the session, ask the horse to stretch again before walking him off
Top lungeing tips
- Use your energy, body language and voice to encourage the horse to move forwards. If the horse needs further encouragement, then point the lunge whip towards the horse’s hindquarters. The whip can be gently brushed or tapped on the horse if necessary
- The handler should use consistent voice commands to ask the horse to move between paces and for more or less energy
- While lungeing, try to maintain a triangle shape, with you at the head of the triangle, your lunge line and whip creating the two sides and the horse as the third side. This will ensure you are in the correct position and do not get in front or behind the horse’s movement
- The horse should show even suppleness through the body in the direction of the circle, tracking up or slightly over-tracking, and shouldn’t be falling in or out. He should have a good swing through the loins with a soft tail and his neck in the appropriate place depending on whether he is working up into a contact or down into a stretch
How to identify if your horse is working correctly on the lunge
NB: Horse & Hound does not recommend leaving the horse standing with side reins attached to the bit when you are not lungeing
Common problems and how to fix them
1. The horse over-bends and falls out through the outside shoulder
Solution: Side reins can help keep control of the outside shoulder, or if you are capable, use two lunge reins — the second rein is attached to the outside bit ring and either goes behind your horse’s quarters or over his withers which will give you control of the outside shoulder.
2. The horse is strong and tries to pull away from you
Solution: Practise using half-halts as you would if you were riding to steady and balance the horse and use a smaller area to lunge so you have more control.
3. Poor handling of the equipment
Solution: Dropping the lunge line on the floor, stepping into your loops or getting them in a muddle is potentially dangerous, so it’s important to spend time handling the lunge line before you have a horse attached. You should be able to hold the reins in large, neat loops held well off the ground and be able to shorten and lengthen them easily. You must also be able to use the whip independently in the other hand at the same time.
4. The horse falls in on the circle
Solution: Keep the horse out by pointing or shaking the lunge whip towards his shoulder. If you are teaching the horse to lunge, ask someone to lead the horse around the circle initially while standing on the outside of the circle to help guide him.
5. The horse runs around and around
Solution: If the horse decides to run off and you can’t stop him, gradually decrease the circle size and use half-halts and your voice to steady him.
6. The horse turns in to face the handler
Solution: Check your position and make sure you are staying in line with or behind the horse’s girth while directing energy towards the horse’s hind quarters to keep the horse moving forwards. You may need to walk a small circle so you are stepping towards the horse’s hind end to keep the horse moving, rather than standing still.
Can I lunge a horse with a rider on?
You can lunge a horse with a rider on. During the early stages of starting a horse, after the horse has been accustomed to being lent over, sat on and led around with a rider in the saddle, it is usual for the horse to be lunged with the rider on board. This gives the inexperienced horse the chance to move with more independence while learning to balance with a rider’s weight on their back. Normally at this stage the handler on the lunge continues to give the commands, and the rider will begin to introduce their aids to coincide with the hander’s signals, so the horse starts to learn by association what the rider’s aids mean.
The other situation when it is normal to lunge a horse with a rider on is to improve the rider’s skills – particularly their position, seat and balance. Because the horse is being controlled by the trainer on the ground via the lungeing tack, the rider can focus on themselves. Being able to ride without reins (and stirrups), without being concerned about controlling the horse, can be an excellent training opportunity. Finally, horses used for the equestrian sport of vaulting are also lunged with one or more riders on board.
- To stay up to date with all the breaking news throughout the Paralympic Games, Burghley, Horse of the Year Show and more, subscribe to the Horse & Hound website

How do I lunge a young horse? Useful advice from Jennie Loriston-Clarke

What is lateral work, and how can it help my horse?

How walk work over poles benefits equine rehab and strength

9 bits designed with young horses in mind

Subscribe to Horse & Hound magazine today – and enjoy unlimited website access all year round


