Read part one of our training series with William Micklem on safer jumping
Read part two of our training series with William Micklem on safer jumping
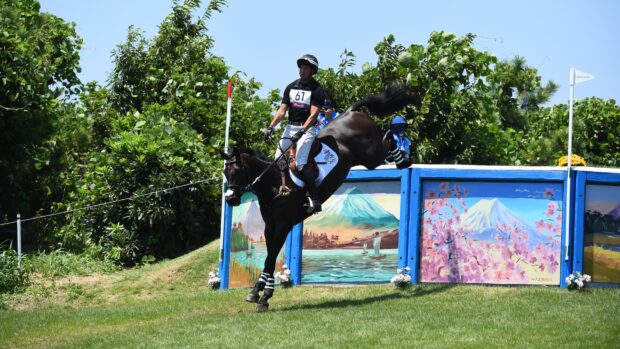
For the horse trials rider to maintain a secure balance down drops and when a horse hits a fence, it is necessary to open the angles of the knee and hip in the second half of the jump.
In the safety position, the lower leg stays perpendicular, which means that as the horse descends, the heel has to move forward in front of the girth, and you have to ride short enough to keep the seat clear of the saddle (see picture above right).
If you ride too long it is not possible both to keep the lower leg secure and the seat clear of the saddle. The result is either that the lower leg swings backwards or that the rider’s seat gets a kick forward from the saddle. In either case, it is an accident waiting to happen.
Learning the safety position
There is a simple three stage progression to establishing a “second nature” safety position that is seldom used.
Stage 1
First you need to establish a balance with your seat out of the saddle, walking and then trotting uphill without having to grip, as though you were improving your show jumping balance.
Then you do the same thing down hills, still with your seat out of the saddle, but allowing the stirrup leather to stay perpendicular. This keeps a secure position of the lower leg, which is the foundation of a jumping position, with the weight going down through the leg.
When this is easy to do you start opening the angles of the knee and hip for, say, three seconds. Then close the angles again.
Stage 2
Next jump down from a bank from a slow trot, making this same opening of the angles as the horse jumps off and then closing the angles as they land. This allows a rider time to make these movements and to keep practicing the second half of the jump, without having to worry about anything else.
As you open up the knee and hip joints going down a drop you end up in almost a dressage position, but with the weight through the legs and seat clear of the saddle. The rider’s position coming off the bank will be the same as that required for all drop fences and, with a reduced opening of the angles, for the second half of all cross-country fences.
By establishing the right movement now, it will help the balance for all types of fences – another safety bonus.
Stage 3
Practice this technique at the canter, with fences that have a drop, until it becomes second nature. As well as being more secure, it will also mean you will be in a better position to steer your horse on landing towards the next fence. This will make a huge difference at water fences, as it is the loss of the rider’s balance as they drop down into the water that is a major factor in making water fences so influential.
Using the wooden horse
William Micklem has come up with a new and inventive way of making sure you are sitting in this ‘golden safety position’ using a ‘wooden horse’ as a training tool.
As the pictures below show, the wooden horse lets a rider practice their positions for riding up and down hills, and jumping down drops, as well as try out opening up the angles of their hip and knee.
It also allows you to make sure that your centre of mass is over the horses’ centre of mass. To help your horse and keep you safe, a rider should aim to have their centre of mass, the horses’ centre of mass and their heel in vertical alignment.


Read part one of our training series with William Micklem on safer jumping
Read part two of our training series with William Micklem on safer jumping
Don’t miss this week’s Horse & Hound, on sale 22 October, to read the third and final part of our training series in full